 Pin it
 The crisp autumn afternoon I decided to make my first turkey-shaped sourdough loaf stands vivid in my memory. I was hosting Thanksgiving for the first time, nervous about the food, when inspiration struck after leafing through an old artisan baking book. The rhythm of folding and shaping the dough became meditative as golden light filtered through kitchen windows. What began as an experiment to ease pre-holiday jitters transformed into a tradition that now marks the beginning of our holiday season.
Last November, my usually stoic father-in-law actually gasped when I unveiled this bread centerpiece. My daughter had helped shape the tail feathers, pressing her little fingers into the dough to create texture while telling me about her day at school. The kitchen smelled of fermentation and possibility as we worked, a quiet collaboration that spoke volumes about connection through food.
Ingredients
- Bread flour: The higher protein content gives your turkey structure and helps achieve that perfect balance of chew and tenderness beneath the crust.
- Active sourdough starter: I learned that a starter fed 8-12 hours before baking gives the perfect level of tangy complexity without overwhelming the flavor profile.
- Fine sea salt: I once forgot the salt and the loaf was disappointingly flat-tasting, so I now measure this ingredient first as my reminder.
- Black olives or peppercorns: These bring your bread turkey to life with personality, and I prefer olives since they maintain their color better during baking.
- Red bell pepper: After trying various options, bell pepper holds its shape and color best for creating that distinctive turkey wattle.
Tired of Takeout? 🥡
Get 10 meals you can make faster than delivery arrives. Seriously.
One email. No spam. Unsubscribe anytime.
Instructions
- Begin with autolyse:
- Mix your flour and water just until no dry spots remain, then cover and let this shaggy mixture rest for 30-45 minutes. You can actually see the flour particles softening and hydrating during this important rest.
- Introduce your starter and salt:
- Work the starter in with gentle pinching motions, then sprinkle the salt over the surface before folding it through. The dough will feel alive under your fingertips as you incorporate these elements.
- Build strength with folds:
- Rather than kneading, perform 3-4 sets of stretch and folds over 2 hours, spaced about 30 minutes apart. With each set, youll feel the dough becoming more elastic and cohesive.
- Let time work magic:
- Cover your bowl and allow for a 5-7 hour bulk fermentation at room temperature. Youre looking for a doubling in size with a surface scattered with bubbles that tell you fermentation is well underway.
- Create your turkey shapes:
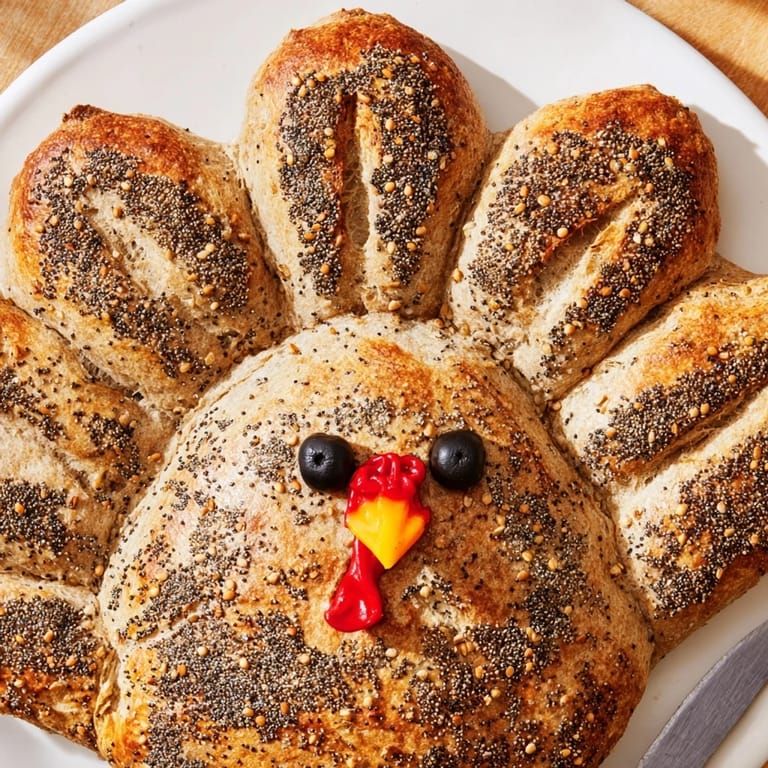
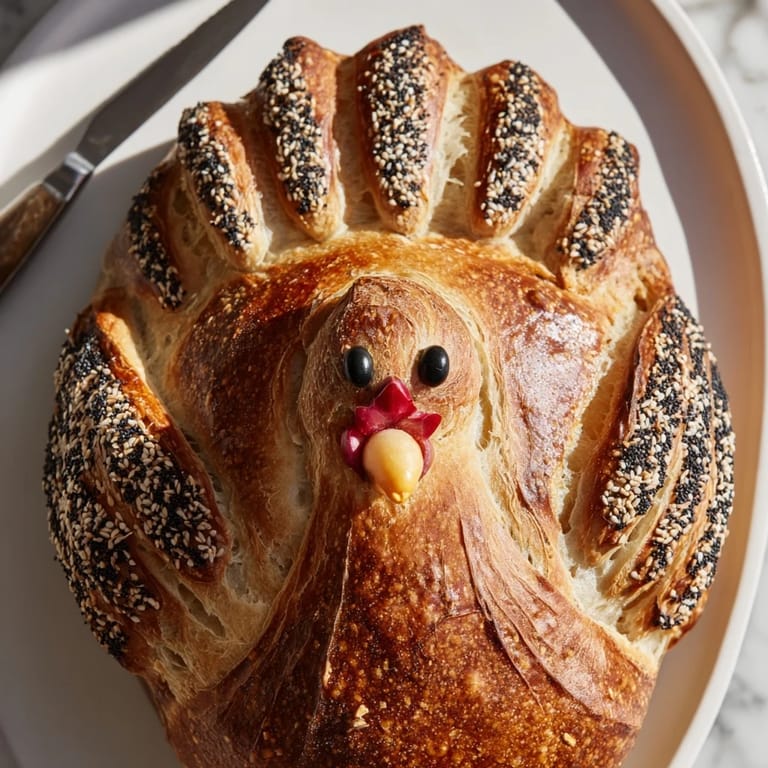
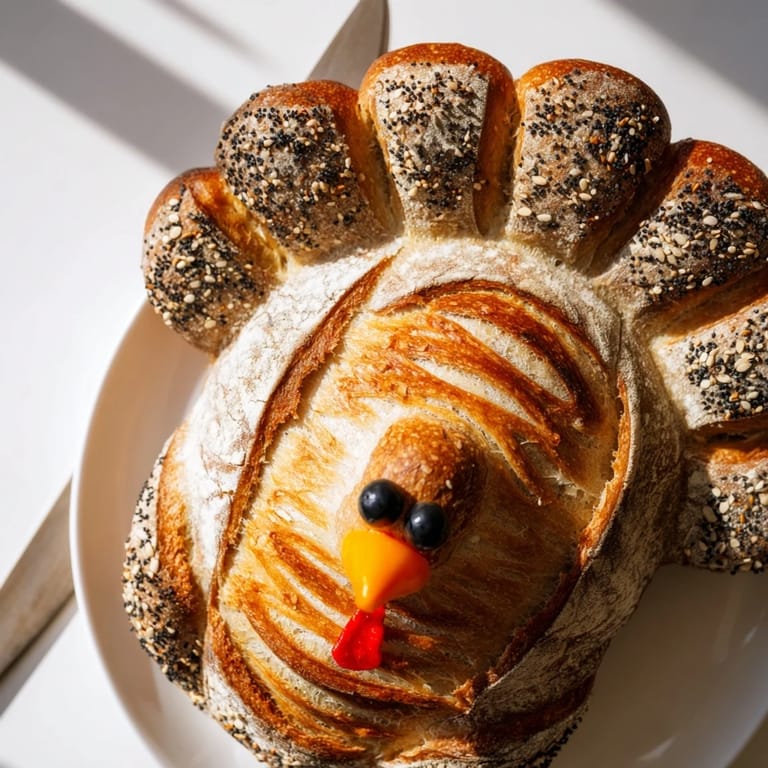
- On a lightly floured surface, divide and shape your dough into body components. The main oval becomes the body, a small round becomes the head, and several teardrops create the distinctive tail feathers.
- Assemble with artistic flair:
- Arrange your shapes on parchment paper, using water as glue to connect pieces. Score feather details with confident strokes of your knife or lame to create texture that will expand beautifully in the oven.
- Add personality:
- Press olive pieces or peppercorns in for eyes, and attach a small red wattle. These details make all the difference between a shaped loaf and a conversation piece.
- Final rise and preparation:
- Allow your assembled turkey to proof for 1-2 hours until slightly puffy but still holding its shape. Meanwhile, preheat your oven fiercely with a stone or steel inside to capture that initial heat blast.
- Optional embellishment:
- Brush with egg wash for a glossy finish or use plant milk for a vegan alternative. Sprinkle seeds strategically to suggest feather patterns that will bake into the crust.
- Bake with drama:
- Slide your creation into the oven on its parchment and create steam for the first 20 minutes. The initial high heat gives way to a gentler bake that develops color and flavor without burning.
- Exercise patience:
- Cool your masterpiece completely on a wire rack before presenting or cutting. The crackling of the cooling crust is natures applause for your efforts.
 Pin it
 Two years ago, my neighbor knocked on our door during Thanksgiving week, looking stressed about her menu plans. I sent her home with half of my turkey bread and a container of salted honey butter. The next morning, she texted a photo of her empty bread board with crumbs and the message: My kids ate the whole thing for breakfast and now demand I learn to make this. Your bread just saved my holiday.
Seasonal Adaptations
While designed for Thanksgiving, this shaping technique adapts beautifully to other occasions. For spring gatherings, I shape the same dough into a rabbit by creating a round body, oval head, and two long ear pieces. Summer barbecues get a fish-shaped loaf with overlapping scales scored into the surface, while winter holidays transform the design into a wreath or star with cranberries and nuts incorporated into the dough.
Troubleshooting Common Issues
The most frequent challenge comes when pieces separate during baking. Through trial and error, I found that scoring where pieces meet actually helps them bake together rather than apart - counterintuitive but effective. Another common issue is uneven baking, which I solve by rotating the loaf halfway through and sometimes covering parts with foil if they brown too quickly.
Serving Suggestions
This bread begs to be the centerpiece of your table, surrounded by small dishes of compound butters, olive oils, and dipping sauces that complement your meal. I once created a grazing board with the turkey bread in the center, surrounded by cheeses, cured meats, and seasonal fruits that guests could enjoy while the final dinner preparations came together.
- For a sweeter option, mix 4 tablespoons soft butter with 1 tablespoon maple syrup and a pinch of cinnamon for spreading.
- Create herb butter by combining 1 stick softened butter with 2 tablespoons fresh chopped herbs and a touch of lemon zest.
- Keep a small bowl of flaky sea salt nearby for guests who prefer their bread with just good butter and a sprinkle of salt.
 Pin it
 This bread has taught me that sometimes the most memorable food isnt about technical difficulty but about showing up with creativity and heart. Each time we tear into its crusty exterior, sharing pieces around the table, Im reminded that breaking bread together is one of lifes simplest and most profound pleasures.
Recipe Questions & Answers
- → How long does the fermentation process take?
The total fermentation consists of a 5-7 hour bulk ferment at room temperature after mixing and stretch-folds, followed by a 1-2 hour final proof after shaping. Including preparation and baking time, plan for 11-13 hours from start to finish.
- → Can I make this vegan?
Yes, this sourdough is naturally vegan-friendly. Simply skip the egg wash or substitute with plant-based milk brushed on before baking. The dough uses only flour, water, sourdough starter, and salt with no animal products.
- → What temperature should my kitchen be for fermentation?
Ideal fermentation occurs at 21-23°C (70-74°F). Cooler temperatures will extend fermentation time, while warmer environments will accelerate it. Monitor your dough's rise rather than strictly following timing for best results.
- → How do I create defined feather details?
Use a sharp bread knife or lame to score linear patterns across the teardrop-shaped feather pieces before final proofing. Score at a 45-degree angle for authentic feather appearance. These scores will expand during baking, creating dimensional texture.
- → Why is a preheated baking stone important?
A thoroughly preheated baking stone or steel provides immediate, sustained heat that causes rapid oven spring—the initial rise when bread hits heat. This creates maximum rise and a superior crust structure compared to baking directly on a rack.
- → What if my dough tears during shaping?
Gently press torn edges together and dampen with a small amount of water to seal. If significant tearing occurs, allow the dough to rest 20-30 minutes under a towel, then resume shaping. The gluten will relax and become more pliable.